(JDBC) JDBC 구성 요소(아키텍처) - 2
JDBC 개요
JDBC(Java Database Connectivity)는 Java 애플리케이션이 데이터베이스와 상호작용할 수 있도록 하는 표준
API입니다 JDBC 여러 구성 요소로 이루어져 있으며, 각 요소는 데이터베이스 연결, 쿼리 실행 결과 처리등의 역할 분담합니다.
JDBC 구성 요소
- Driver : 특정 데이터베이스와의 연결을 처리하는 인터페이스 구현.
- DriverManager : JDBC 드라이버를 관리하고 데이터베이스 연결을 설정
- Connection : 데이터베이스와 세션을 나타냄.
- Statement : SQL 쿼리를 실행.
-ReasultSet : 쿼리 결과를 저장하고 탐색.
-SQLException: JDBC 작업 중 발생하는 예외 처리
1. Driver
설명 : java.sql.Driver 인터페이스를 구현한 클래스로 , 특정 데이터베이스와의 연결을 처리합니다. 각
데이터베이스(MySQL,Oracle. PostgreSQL 등)는 고유한 JDBC 드라이버를 제공합니다.
역활: 데이터베이스 연결 설정, SQL 쿼리 실행 지원,
현대적 사용법 JDBC 4.0 이상에서는 드라이버가 자동으로 로드되므로 Class.for.Name()호출이 필요하지
않을 수 있다. 드라이버 JAR 파일이 클래스 경로에 포함되어야 합니다.
예시 코드
// MySQL
Class.forName("com.mysql.jdbc.Driver");

// Oracle
Class.forName("oracle.jdbc.driver.OracleDriver");

//MSSQL
Class.forName("com,microsoft.jdbc.sqlserver.SQLServerDriver");
2. DriverManager
설명 : JDBC 드라이버를 관리하고 데이터베이스 연결을 설정하는 클래스입니다.
역활: URL, 사용자 이름, 비밀번호를 기반으로 적절한 드라이버를 찾아 Connection 객체를 반환
주의 : MySQL 8.0 이상에서는 JDBC URL에 serverTimezone 파라미터를 지정해야 연결 오류를 방지할 수 있습니다.
예시 코드
String url = "jdbc:mysql://localhost:3306/mydatabase?serverTimezone=Asia/Seoul";
Connection connection = DriveManager.getConnection(url,"root","password");
3. Connection
설명 : 데이터베이스와의 세션을 나타내는 객체입니다. (세션(session)은 데이터베이스와 애플리케이션 간의
논리적인 연결 상태를 나타냅니다.)
- 역활 : SQL 쿼리 실행, 트랜잭션 관리.연결 종료.
-비유 : 데이터베이스와의 "통신 채널 "러 생각할 수 있습니다.
예시 코드
Connection connection = DriverManager.getConnection(
"jdvc:mysql://localhost:3306/mydatabase?serverTimeZone=Asia/Seoul",
"root","password"
);
4. Statement
설명 :SQL 쿼리를 데이터베이스에 전송하는데 사용됩니다.
종류
-Statement : 기본SQL 쿼리 실행
-PreparedStatement : 매개변수화된 쿼리 실행, SQL 인 jection 방지.
권장사항: 보안과 성능을 위해 PreparedStatment를 사용하는 것이 일반적입니다.
예시코드
Statement stmt = connection.createStatment();
ResultSet resultSet = Stmt.executeQuery("SELECT * FROM user WHERE id = 1");
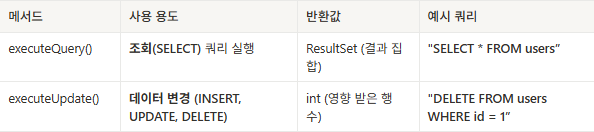
Statement 주요 메서드
-executeQuery()
-executeUpdate()
5. ResultSet
설명 : 쿼리 실행 결과를 저장하는 객체입니다.
역활 : 데이터를 행 단위로 탐색하고 열 값을 읽음.
탐색 옵션
- 기본 :순방향 탐색(next())
예시 코드
while (resultSet.next()){
int id = resultSet.getInt("id");
String name = resultSet.getString("name");
System.out.println("ID" + id + ", Name " + name);
}
6. SQLException
설명 : JDBC 작업 중 발생하는 예외를 처리합니다.
특징
- SQLstate : 표준화되 오류 코드
-errorCode : 데이터베이스별 오류 코드.
역활 : 오류의 원인을 추척하고 적절히 처리.
try{
Connection connection = DriverManager.getConnection(url.user,password);
}catch(SQLException e) {
System.err.println("SQL State: " + e.getSQLState());
System.err.println("Error Code: " + e.getErrorCode());
e.printStackTrace();
}
7. 실습 하기
statement
package ch02;

import java.sql.*;

public class JDBCExample {

    public static void main(String[] args) {

        // 데이터 베이스 접근 주소
        String url = "jdbc:mysql://localhost:3306/school?serverTimezone=Asia/Seoul";
        String user = "root";
        String password = "asd1234";

        // JDBC 를 사용하기 위해서 필요한 클래스(구성요소)
        Connection conn = null;
        Statement  stmt = null;
        ResultSet rs = null;

        try {

            // 1. 데이터베이스 연결 요청
            conn = DriverManager.getConnection(url, user, password);
            System.out.println("MySQL 데이터베이스에 성공적으로 연결 되었습니다.");

            // 2. Statement 생성
            stmt = conn.createStatement();

            // 2. 1 - 쿼리 실행해 보기
            // executeQuery -> Select 사용시 메서드 호출해야 함
            // rs = stmt.executeQuery("select * from tb_student where no = '20170001' ");
            rs = stmt.executeQuery("select * from tb_student ");

            // 3. 결과 실행
            while(rs.next()) {
               String no = rs.getString("no");
               String name = rs.getString("name");
               String gender =  rs.getString("gender");
               int age = rs.getInt("age");
                System.out.print("no : " + no + "\t");
                System.out.print("name : " + name+ "\t");
                System.out.print("gender : " + gender+ "\t");
                System.out.print("age : " + age+ "\n");
            }
        } catch (Exception e) {
            e.printStackTrace();
        } finally {
            // JDBC 기술을 사용하면 데이터 베이스에서 자원을 얻기 위해
            // 객체가 계속 대기 하고 있다 ---> 자원 해제를 해야 한다.
            // 4. 자원 해제 하기 (준비물에 역순으로 처리 해야 한다.)
            try {
                rs.close();
                stmt.close();
                conn.close();
            } catch (SQLException e) {
                System.out.println("자원 해제 중 오류 발생 : " + e.getMessage());
            }
        }
    }
}
내가 다시 작성한 코드
statement
package cho2;

import java.sql.*;

public class JDBCExample2 {

    public static void main(String[] args) {

        String url = "jdbc:mysql://localhost:3306/employees?serverTimezone=Asia/Seoul";
        String user = "root";
        String password = "asd1234";
        // String url ="jdbc:mysql://localhost;3306/employees?serverTimezone=Asia/Seoul";
        // String user = "root";
        // String password = "asd1234";


        Connection conn = null;
        Statement stmt = null;
        ResultSet rs = null;

        try {
            conn = DriverManager.getConnection(url, user, password);
            stmt = conn.createStatement();
            rs = stmt.executeQuery("select * from dept_emp");
            // TODO rs = stmt.executeQuery(""); 안에 더 복잡한 코드도 넣을 수 있다.
            // TODO stmt.executeUpdate(); 업데이트 가능한 코드이다.
//            rs = stmt.executeQuery("select e.emp_no, e.first_name, s.salary, t.title\n" +
//                    "from employees as e\n" +
//                    "inner join salaries as s on e.emp_no = s.emp_no\n" +
//                    "inner join titles as t on e.emp_no = t.emp_no\n" +
//                    "where t.title = 'Senior Engineer' and e.first_name like 'ram%' and s.salary > 100000;\n");

            while (rs.next()) {
                int emp_no = rs.getInt("emp_no");
                String dept_no = rs.getString("dept_no");
                String from_date = rs.getString("from_date");
                String to_date = rs.getString("to_date");

                System.out.print("emp_no : " + emp_no + "\t");
                System.out.print("dept_no : " + dept_no + "\t");
                System.out.print("from_date : " + from_date + "\t");
                System.out.print("to_date : " + to_date + "\n");
            }
        } catch (SQLException e) {
            e.printStackTrace();
            // e.printStackTrace() 예외 발생 시 콘솔에 전체 스택 트레이스를 출력하여 디버깅에 도움을 줍니다.
            // 스택 트레이스(Stack Trace)는 예외가 발생했을 때 어디서,
            // 어떤 경로로 오류가 발생했는지를 보여주는 메서드 호출 기록 목록입니다
        } finally {
            try {
                rs.close();
                stmt.close();
                conn.close();
            } catch (SQLException e) {
                System.out.println("자원 해체중 오류 발생 : " + e.getMessage()); // ( e.getMessage()); 예외 발생 시 해당 예외의 상세 메시지를 반환합니다.)
            }
        }


    } // end of main
}
preparedStatement
package ch03;

import java.sql.*;

public class JavaJDBCExample3 {

    public static void main(String[] args) {

        // MySQL 서브접근 하기 - 주소 계정,비번
        String url = "jdbc:mysql://localhost:3306/school?serverTimezone=Asia/Seoul";
        String user = "root";
        String pwd = "asd1234";

        //자바 ---> MySQL에 젒근하기 위한 준비물
        //JDBC 인터페이스를 보고 구현한 각 회사에 JDBC 구현 클래스들이 필요
        // 해당 제품에 lib를 다운로드 받아서 우리 프로젝트 연결

        Connection con = null; //연결
        // Statement --> 보안 성능 좋은 녀석 --->  PreparedStatement
       //Statement stmt = null; //진술
        PreparedStatement pstmt = null;
        ResultSet rs = null; //결과 집합

        try {
            //Driver 로드 (최근 작성할 필요 없다.)
            //Class.forName("com.mysql.cj.jdbc.Driver");


            //1. 데이터베이스에 연결 요청
           con = DriverManager.getConnection(url,user,pwd);

           // Statement 생성해야 함
           //stmt = con.createStatement();
            // prepareStatement 생성 (미리 쿼리 구분을 함께 만들어 줌 일부분만)
            pstmt = con.prepareStatement("SELECT * FRON tb_student where no = ? and age = ? ");
            // pstmt.SetInt(); ? 표 순서 기준으로 해당하는 데이터 타입을 명시
            pstmt.setString(1,"20170001");
            pstmt.setInt(2,25);

           //3. 쿼리를 만들고 실행 요청해야 한다. --> 수행후 ResultSet 객체 생성
           //rs = stmt.executeQuery("SELECT * FROM tb_student tb_student where no = 1234"); // 습관적으로 뒤에 공백하나 추가( ")
            rs = pstmt.executeQuery();

            // 4. 결과(응용해서 프로그래밍 처리)
            //결과 추출하는 기법(Set 자료구조에서)
            while (rs.next()) {
                String no = rs.getString("no");
                String name = rs.getString("name");
                int age = rs.getInt("age");
                System.out.println("no :" + no + "name : " + name + "age : " + age);
            }


        } catch (Exception e) {
            e.printStackTrace();
        } finally {
            try {
                if(rs != null) rs.close();
                if(pstmt != null) pstmt.close();
                if(con != null) con.close();
            } catch (SQLException e) {
                throw new RuntimeException(e);
            }
        }
    } // end of main
} // end of class